Regor's Goldwing Scrapbook
[ Home ] [
Search ] [ About Us
] [ Submit Pics/Docs/Suggestion ]
("Submit" Turned off due to hacking
- Sorry )
Pick from the list below to see an accessory on a Goldwing
↓
↓
Get your tips here
↓ ↓
WingIt
Links
Support your Small
Business Owner
↓ ↓
Vendors
Please Sign
↓ ↓
↓ ↓
Misc Pics
Need your own Web space
1000MB 50GB Web Hosting
for only $9.95/month with no
contracts. PHP4, MYSQL, CGI,
SSH all included.
Click here!
Temperature
Tips
Back to Tips
There have been numerous reports of overheating on the GL1800. I personally experienced this problem at the 2001 Honda Homecoming Light Parade. We traveled at speeds around the 15-30 mph range, most of the time in second gear, and my temperature rose just below the red line. When I could get to speeds above 30 mph or at rest the temperature seemed to recover. My second occasion was on the Dan Ryan Expressway in Chicago. Again, the bike and I came very close to the red line. The really disturbing thing about this is that there is no place to pull over.
Overheating
Select forum comments on this subject:
- The overheating issue is one of the few that seems to be in the majority
(if not all) of the gl1800's, a design issue maybe? They probably never ran
that slow that long during testing.
- It is not the stop and go that causes a problem. It is the slow going
somewhere between 10 to 25 mph and staying in first or 2nd gear. While at a
stop, the bike's radiators & fans seem to work fine and anything over 25
mph & getting up to 3rd gear everything works fine again.
- My dealer let mine idle for 1.5 hours and never moved from there. When he told me, I said go outside to the parking lot and run the bike at 18-20MPH in second gear. After 6 minutes the gauge started moving up and after 10 it was almost getting to redline. He stopped there. Below 15MPH fans are running and it WILL NEVER OVERHEAT. After 15MPH the fans WILL STOP no matter water temperature and continuing that speed WILL OVERHEAT. After 22-55MPH the upcoming airflow is enough to cool the system without the need of the fans and WILL NOT OVERHEAT.
Jerry Roebke's Proposed Fix Posted on the GL1800.org Forum
Modifying the Fans to Reverse Flow
Don’t start this project unless you are the Inquiring Mechanical type with
good skills and an open mind!!!!
My Purpose was to simply reverse the direction the fans operate. With the
original setup they are set up as Pull type and I wanted to make them Push type
to direct the Air Flow out of the side with the passing air flow instead
of
forward against the incoming air.
Before starting this project I ordered two Fan Blades and Motor Shaft Collar’s to get an idea of the problems involved. Simply turning the Blades around isn’t enough. Due to the Off Center nature of the blades I needed to modify the mounting position on the Motor Shaft by .125” closer to the motor.
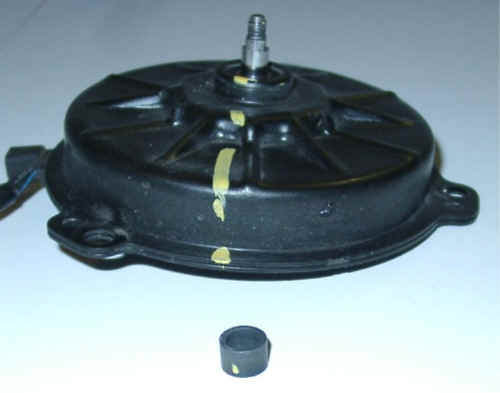
|
Original Fan Assembly |

Modifying the Motor Shaft and Collar was going to be the only hard part in the project but it seemed do-able to me. I had some hollow shaft on hand to make shorter Collars from, lucky me.
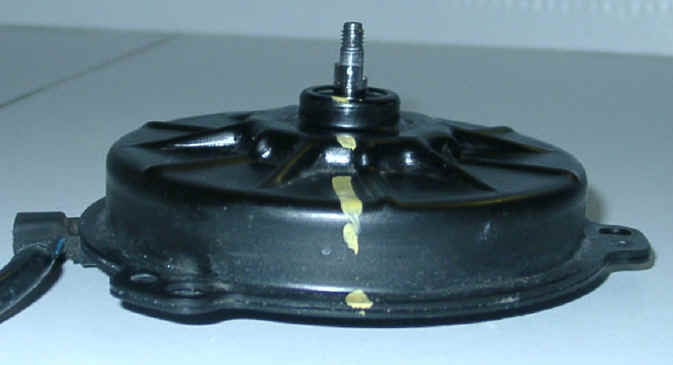
|
Motor With Collar Off |
The Motor shaft has two flats that need to be cut deeper toward the motor and
the Collar needs to be shortened or cut short to match. The Collar needs to be
shortened form .275” to .15” and the shaft flats cut the same amount.
Careful
work with a file could handle the flats on the shaft.
|
One Side of Shaft Cut |
The other modification was to trim the Fan Blades of the “Wing Tips” that
could hit the radiator when turned around. That just required a little careful
work with a file and trim knife. I did this before opening up the Wing. Gutting
her
would be a better description)
After Gutting the wing I removed the Fan Assemblies and observed the needed
clearance for the new, pre modified, Fan Blades.
The Nut holding the blade on the shaft was removed along with the blade and
collar. Then the motor was removed and examined.
|
Collars and Washers |

I had to fabricate the new collars and lacking a Lathe I improvised with some
matching material and the handy poor mans lathe, a drill press and hacksaw.
After cutting the new collars they were trimmed up and measured with a
micrometer to make sure that the fan blades wouldn’t wobble. A few file
strokes took care of them within .001”.
After putting the shorter collar in place I marked the shaft with a sharpie and
started filing the flat deeper toward the motor. Be careful hear and don’t get
carried away. By all means keep the original profile or the blade may run
off
center. I used a file the had one side smooth which was placed against the
original flat while filing downward toward the motor with the shaft held in
position with a small pair of pliers. This worked well and after reaching the
mark the flat was trued up with a couple of controlled file strokes. Then comes
the other side and making sure that the fan seats properly.
After placing the new collar and turned over fan blade you will find that the
shaft extends through the blade by the amount that the collar was modified. For
this I could have made some more collars but two small washers worked much
better and quicker. When mounting the blades I used some Blue Loctite per the
manual to keep the blade firmly mounted.
Depending on what you have floating around you may be able to use washers for
both sides of the fan blade and avoid making shorter collars. If you choose this
route make sure the washers between the blade and motor don’t rub
against
the ball bearing seal.
Ok the hard part is done now the Polarity to the Motors needs to be reversed.
This is easy and only requires a jeweler’s screwdriver. On the Motor Plug you
will find two spade connectors and these will need to be removed and reinserted
in the opposite hole in the housing. There is a locking tab on the side of each
spade connector and I found that a wide blade jeweler’s screwdriver works well
to release the tab. Make sure you note the color-code on each wire, there are
only 2 in each plug, and put them back in the opposite hole. Simple, now the
fans will rotate in the Opposite Direction and the curvature of the Fan Blades
will match.
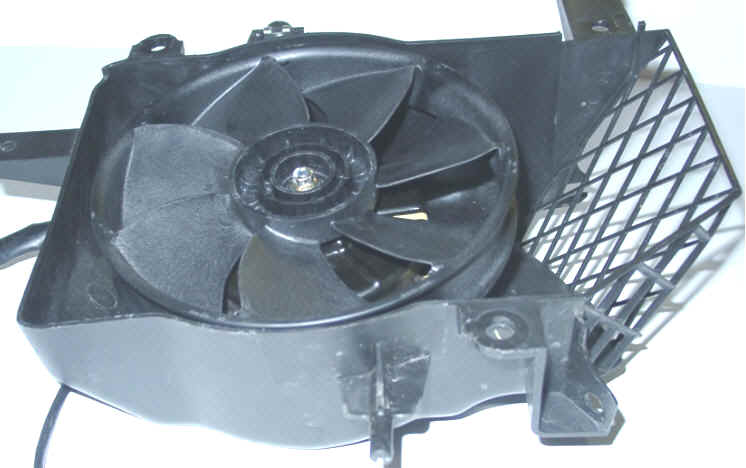
|
Reversed Fan |
After putting everything back in place I only had 2 screws left over. Why do I
always have a few parts after one of these projects? Oh well the next I tear
into the bike I will probably find where they go but then the screws will
be
missing)
It was Time for a test drive to see if it all worked as I hoped it would. After
a warm up drive to and from lunch I went back to the same level parking lot
where I had confirmed the overheating problem we had while house hunting.
The
test was simple just cruse around the parking lot in 2d gear at 1200 to 1300 rpm
keeping the speed below 15mph. With my previous test the temp started climbing
after 5 minutes and at 10 minutes it was in the RED Zone and at 250
degrees. This time at 10 minutes it was still below the middle mark and the fans
were running full time. After 15 minutes the temp gauge was still below the
middle mark and didn’t seem like it would ever rise to the middle mark.
I
parked the bike and used the IR Gauge to take its temp. It measured right at 200
degrees at the radiator inlet where pre-mod it had been 250 degrees.
Just to try out the 20mph problem that some have I ran for 5 more minutes above
the 15mph shutoff and the temp did get just above the middle mark. When slowing
down to below 15mph the fan came back on and got the needle below the middle
mark quick enough. I was going to run this test over various speeds but the
parking lot was filling up at the church and I had head out.
Over all the bike worked much better that the pre-mod and the heat from the fans
blowing out the side wasn’t notable. The ambient temp was 81 with a light
wind. This time there wasn’t any blast of HOT air coming up the Fork Tunnel
as
there had been with the stock fans. When the stock fans are trying to push
against the incoming air the only place for it to go is up into your face and
chest. Not too pleasant on a hot day. With the modified fans the hot air at
least has a chance to move with the air past you.
After this little modification I think I will finally put on that set of Baker
Air Wings. They should allow us to direct some of that heat in the winter and
keep any unexpected blast away in the summer.
If you are thinking about this the first step is to get a Service Manual and
look over it. You will need to remove the Seat and ALL of the Plastic forward
except for the Fender. Lucky You, so study the Manual well)
Modifying the Fan’s is fairly simple and should only take 15 to 20 minutes
each if you have material for new Collars on the motor shaft. Allow a full day
for removing the Body Panels and trying to figure out where all the bolts &
Push
Fasteners go.)
Adding a Thermostatic Switch
My Purpose was to add an inexpensive Thermostatic Switch to add to the fan control at speeds above 15 MPH and temperatures above 210 degrees.
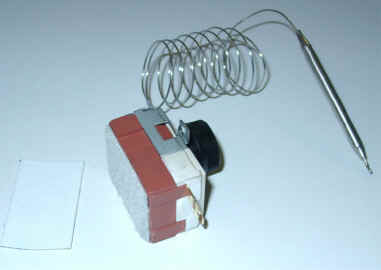
|
Thermostatic Switch |

The reason not to replace the existing control that there is no need to replace a circuit that works well with the corrected fan ducting. That is fan’s that now work with the direction of M/C travel, not against it. The addition of a Thermostatic Switch with it’s sensor placed on the Inlet Hose to the Right Radiator and control head mounted ahead of the right fairing pocket requires a minimum of work and is a simple installation.
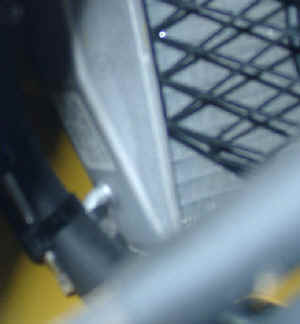
|
Sensor Located on Right Inlet Radiator Hose |
You could attach the sensor to the outlet side, read out side where it can be seen and won’t look pretty, of one of the Radiator’s if you want to. The Thermostatic Switch was mounted with Velcro to the inside of the Fairing with the Right pocket removed.
|
Thermostatic Switch Placed Inside Right Fairing Pocket |
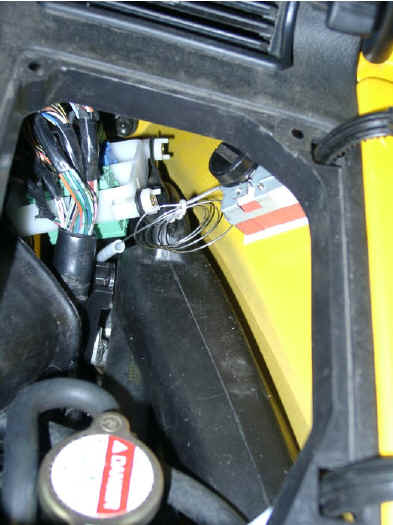
It could also be mounted to the front side of the pocket by drilling 2 mounting holes and a hole for the adjustment shaft to extend into the pocket thus enabling easy adjustment. With my installation I used a radio Knob out of the junk box to make adjustment easier after the pocket is removed for access. If I ever need to readjust the unit in the future I think that I’ll drill the holes in the pocket to make things easier). One side of the Thermostatic Switch was wired to ground and the other side was connected to Relay 3 with a crimp on connector.
|
Relay 3 |
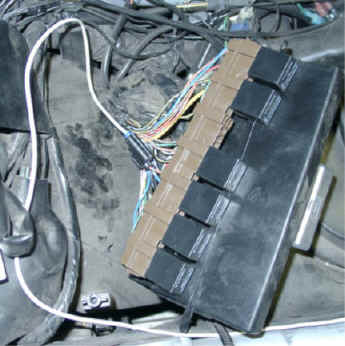
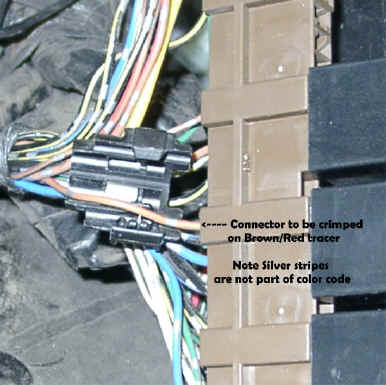
The crimp on connector has a female plug for easy attachment to either a Thermo Switch or Manual switch or whatever may present it’s self. I can also simply pull the plug and remove this modification if needed in the future. On Relay 3 the Brown/Red wire is the control lead from the ECM and requires a ground to operate the relay thus having the Thermostatic Switch in parallel there either one or both can control the fans. The Brown/Red wire is Brown with a narrow tracer of Red that runs lengthwise and it may also have a few silver stripes on it.
|
Brown/Red Wire - Relay 3 |
At speeds below 15 MPH the ECM controls the fans if needed and at temperatures above the set point on the Thermostatic Switch (Thermo Switch) it controls the fans at any speed. With my installation the ECM shuts off the fans above 15 MPH and the Thermo Switch doesn’t turn them on until the temperature gauge gets a little above the middle mark. When I adjusted my Thermo Switch the right pocket was left loose with the fasteners out. The bike was run in the 17 MPH zone until it reached a point above the middle mark on the temperature gauge and my IR Thermometer read 210 degrees on the inlet tank. At this temp I rotated the adjustment knob on the Thermo Switch until I felt it click on. By rotating the adjustment across the on / off points I established a point between them and left it there for further testing which verified it’s function. After checking for proper function I put the fasteners back in the pocket and called it good, for now)
The only thing I had to purchase was the Thermostatic Switch for fans. It
came from Advance Auto Parts and cost $19.07. All of the small pieces were from
parts on hand like the wiring connectors. The Collar's I used for the Fan
modification were made from tubing out of the junk box but someone could
use small OD washers for them if they don't hit the bearing seal on the motor.
One thing that I did purchase before starting this was a pair of Fan Blades
from PartsFish.com. The only reason for
that was to get a look at them before taking the bike apart. It was worth the
$70 to get a head start on the project. Now I still have the original fan
blades if Honda ever comes up with a "Fix" that can be re-installed. A
person could always turn the modified blades back to the original position if
needed though.
Temperature Test
- The Wing's Temp gauge is not an "Idiot
Light" - Temperature Test, July 4th, 2001
- Just to see if the 01's temp gauge was telling the truth I gave ours the
acid test today.
Ambient Temp = 86 deg F
Speed = 10 to 15 mph in empty parking lot.
Temp gauge was at normal position just below the middle line at start of test.
Time to RED zone while riding in large loop in 1st gear = 10 minutes.
-
Temp was measured at top front of Radiator Inlet Tank.
Gauge used to measure Inlet Tank temp = IR Thermometer as used for HVAC.- Red zone = 240 degrees solid
2 lines above middle = 230 degrees
1 line above middle = 220 degrees
Middle line = 200+ degrees
Normal temp (just below middle line) = 190 degrees
- Red zone = 240 degrees solid
- The bike was ridden until the temp gauge was solid on the Red line then
parked into the wind with engine running to measure the temp drop with the
fans running. It took a very long time to drop from the Red zone to the next two lines,
approx. 15 minutes. The light 10 mph head wind was fighting the fans!!
After turning the bike away from the wind the temp went down much quicker.
- This was just a quick test and I will repeat it again another day just to
see how a different ambient temp will affect the time to cool down. This is
a test that is quick & easy to do with an IR Temp gauge if you have a
friend in the HVAC business to borrow one from. Just point the IR unit at
the top front of the radiator from the side of the fairing and find the
highest reading as your “Spot” to measure. The fin area won’t give you
a good indication of the coolant temp, your looking for the Inlet Tank where
the Hot Coolant comes in at the front edge of the radiator. This will give
you a good indication of actual coolant temp without installing a special
gauge.
- My results tell me that if my Wing gets much above the middle line that
it is getting HOT and what ever you do don’t run close to the RED Zone for
any period of time!!! If I were riding in a drill team the first thing on my list would be to
reverse the Fans. Note that the thermostat is full open at 194 degrees and on our bike that is
about the same temp that it runs at when the needle is just below the center
line, which is just fine.
- I have installed the new wiring harness that Honda has come out with, all
it did was give a more accurate reading I think on the temp. gauge. It still
heats up at slow riding in town etc. Until Honda reverses the fans and has
them running when the radiator's warm up and call for cooling, this problem
will continue.
- I talked with the service manager at the local dealer about the issue. He said they are quite aware of the situation, but have only been able to replicate the problem in *1ST* gear below 15mph. He said that they tried it in 2nd gear below 15mph but the gauge didn't climb. I asked about the rectifier thingy, but he said it wouldn't matter since the fans do NOT switch polarity at some speed. He said they ONLY blow forward in 1ST, but above 15mph the airflow overcomes it. Either way, he said the bike is NOT overheating the engine, only overheating the gauge. They said the wiring harness fix only fixes the sensitivity of the gauge. The rest of the details are hazy now. They claim to be busting their chops on it right now. My company is an OEM for Honda automotive and we work them their engineers all the time, so I know they have the talent.
- Just to see if the 01's temp gauge was telling the truth I gave ours the
acid test today.
- Measuring the temps as you did is good information. Personally, I am not too worried if my 1800 temp gage runs at the middle mark or one mark above it on a warm day, stuck in traffic, or climbing a long grade on a hot day. I would begin to worry if it stayed one mark below the red or approached the red. I would start taking corrective action at that time. Besides corrosion protection for your engine and radiator, the purpose of anti-freeze is to raise the boiling point and lower the freezing point of the mixture. Here are some numbers for you.
A 50-50 mix of anti-freeze and water will boil at 227 degrees F. in an open pan at atmospheric pressure. The cooling system on the bike operates at 15 psi. At 15 psi, the boiling point of a 50-50 mix of anti-freeze and water is 265 degrees F. When the gage was at redline, you measured a temp of 240 degrees, and your coolant was not boiling. I'm going to assume the IR unit you used to measure the temp. was calibrated, so your measured temp of 240 degrees is accurate. This means you are 25 degrees away from boiling with the temp gage at the red mark, so you have a little "cushion" in temp to pull over and reduce the heat load before the coolant starts to boil. At one mark above the middle, you measured a coolant temp of 220 degrees F. That is 45 degrees below the boiling point. I have owned cars and trucks that have had sustained coolant temps of 210-220 degrees while driving across the Mojave desert in the middle of the day with no ill effects.
-
Several people who ride theirs in parades & drill teams have reported a problem with hitting the Red Zone and loosing coolant from the overflow tank. I think that they are indeed getting well above 240 degrees.
Quite a few responses to those reports of overheating were negative and implied that the gauge is "just an Idiot Gauge" and could or should be ignored. I don't think so and my tests proved to me that running in the red is indeed pushing it too far for comfort.
What really got my attention was the slow cool-down with the bike pointed into the 10 mph wind at idle. If I had been riding it at 10 mph into a 5 or 10 mph wind in a parade what temp would it have reached and how easy would it cool down?
At this point I haven't lost coolant because when our wing gets in the Red Zone I do something ASAP to cool it off like getting off of the side streets and onto a major road where we can cruse at 45 mph+.
I wonder what the Temp is for those who have been caught in traffic at 10 to 15 mph for long periods of time.
Under Ideal Conditions most 1800's will probably be OK in the Red Zone for short periods, BUT do they really have a 50/50 mix and a good Cap with Proper Coolant Levels ?
- I agree the 1800's temp gage is not an idiot light, and I certainly would
not operate the bike for long with the gage in the red.
The guys operating 1800's in parades with their temp gages in the red probably have coolant temps over 240 degrees F. The coolant is expanding and the properly installed and operational radiator cap is allowing for the expansion by allowing the excess to go to the expansion tank. If it gets too hot, the expansion tank will certainly overflow and coolant will run on the ground. If the overheating continues, the coolant will boil and you probably will rupture a hose.
The Honda premix anti-freeze is a 50-50 mixture of deionized water and anti-freeze. I'm making an assumption that is what the factory/dealer uses when they fill the system, and there should not be a problem with defective radiator caps and thermostats. However, it would not be the first time a new thermostat has stuck or a radiator cap was faulty.
What I find disturbing is that some 1800 owners have discovered their coolant expansion tanks very low or empty after they just have picked up the bike from the dealer. That doesn't say much for the dealer's attention to detail. It would make you wonder "what else" did he fail to check or do.
My 1800 is my first GoldWing. Before I left the dealership, I read the owners manual from front to back. I also checked all fluid levels including the clutch and brake reservoirs with the sales mgr before I left. The sales mgr also went over the operation of all the controls including the audio system, reverse operation, and adjustment of the suspension system. Only problem I had was they never bothered to clean the cosmoline off the swingarm and wheels. The bike was a demo and the wheels looked like crap. I made them clean things up before I left.
Temperature Gauge Harness
Don, I think you're talking about a service bulletin (for that exact harness) issued for bikes with serial numbers below the 1700 mark; all subsequent bikes had it fixed at the factory.