Regor's Goldwing Scrapbook
[ Home ] [
Search ] [ About Us
] [ Submit Pics/Docs/Suggestion ]
("Submit" Turned off due to hacking
- Sorry )
Pick from the list below to see an accessory on a Goldwing
↓
↓
Get your tips here
↓ ↓
WingIt
Links
Support your Small
Business Owner
↓ ↓
Vendors
Please Sign
↓ ↓
↓ ↓
Misc Pics
Need your own Web space
1000MB 50GB Web Hosting
for only $9.95/month with no
contracts. PHP4, MYSQL, CGI,
SSH all included.
Click here!
Tulsa
Tips
- 3
Back to Tips
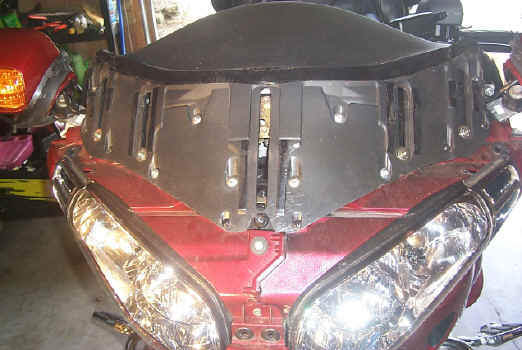
- Remove the other four mounting collars using a Phillips or slotted screw driver. Lay the collars and screws aside. The mounting nut plates that the screw is threaded into will slide to the bottom. That is OK. You will raise in place when the collars are reinstalled. When you remove the last of the four collars, the windshield will no longer be connected to the motorcycle. Lift aside and remove the Phillips screw holding the center collar to the windshield. Note orientation of the back plate (flat side out). Lay the windshield aside.

-
Disassembly is complete. I should have been pretty easy. Reinstall the center collar and back plate before proceeding. Do not tighten.
-
Thoroughly clean the "taped" area across the top of the dash and on each side of the two outside mounting holes with alcohol. Remember that this is as close as alcohol should get to your windshield.
![]()
-
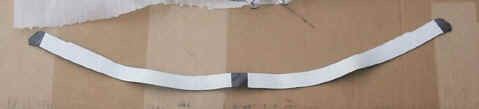
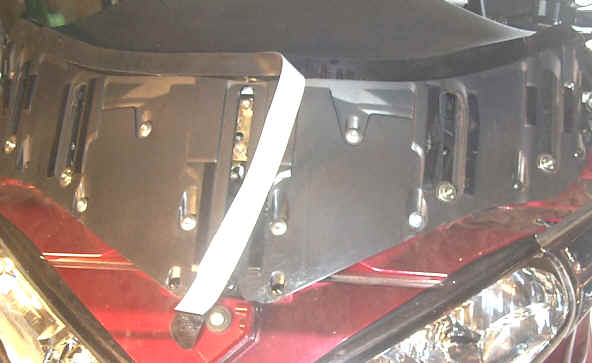
Fold the long gasket in half and mark the center point. Use a razor knife to cut through and remove a small amount of the paper from each end and the middle. Locate the center of the gasket in the middle of the of the windshield but do not press into place. Locate one end and then the other. If necessary, relocate the middle and check to make sure each end fits properly. Once you have a proper fit press the middle of the gasket in place. Remove the tape from one side and press it in place. Remove the tape from the other side and press in place.
![]()
-
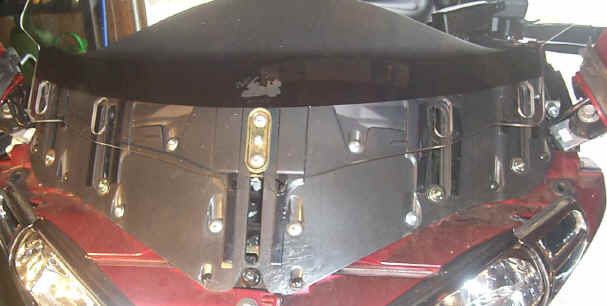
Cut the 4" strip of gasket material into four 1" long strips. Install them inside and outside of the outside mounting screws, located vertically with the top just below the Allen head screw as shown below.
![]()
-
You are now ready to install the new windshield. Install but do not tighten the Allen Bolts (5 mm) that to the center mounts first. This will help hold the windshield in place while you install the other four collars and screws. Install the four collars, tightening only loosely. Go from outside to outside to opposite inside to inside to middle, tightening slightly until all collars are tight. Do not over tighten the mounting screws. Tighten the Phillips head screw.
-
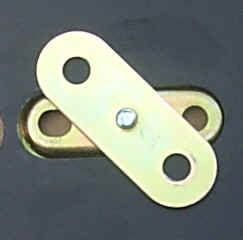
Replace the holder plate. Make sure that the locknut that is holding the stud (the silver object above the white paper) that you are going to fasten to is tight against the spacer. If the lock nut is loose the stud will turn. This is the point that you may want to remove the mirrors. I had difficulty getting the nuts in place. I finally ended up locating the holder plate over one of the studs and used a telescoping magnet to place nut in place and then used my fingers to get the nut started. I only tightened a couple of threads and then attached the other side. Once both sides were attached, I replaced the bolt in the center and tightened. I then tightened each side with a socket (10 mm) and nut driver.
-
Replace the windshield trim. I pushed the B tabs in place first. Then pulled the sides so that they would fit over the boss. If you glued the grommets in place, this job will be easier. Then push the A tabs in place. You probably want to get out your telescoping magnet to hold the washer and screw in place while you get it started with your finger. Once started, finger tighten and then tighten with a 10 mm wrench. Repeat for other side.
-
Replace the rubber boots over the mirrors. The rubber tabs must fit into the openings. Use liquid soap, to help with inserting the tabs. You might need a small slotted screwdriver. However, use it with care so as to not tear the tabs. Once the boot is in place go all the way around it making sure that it is smooth. Repeat for other side.
-
Relatch the windshield levers and you are done. Note the windshield is no longer adjustable.